VLC will record your screen for free, with nothing to install - it just will not record the sound unless you ask it to.
VLC Media Player has a desktop capture mode hidden three menus deep.
It costs nothing, it is already on your PC, and it will keep recording for as long as your drive has room.
It is also missing several things you probably expect, so here is the honest list before you set anything up.
What VLC will and will not record
VLC was built as a player. Screen recording is a side effect of its streaming engine rather than a feature anyone designed, and it shows.
| What you probably want | Does VLC do it? |
|---|---|
| Record the whole desktop as video | Yes, and it is genuinely good at it |
| Record the sound your PC is playing | Not by default. It takes one manual option, covered below |
| Record your microphone | Same method, same fiddliness |
| Show the mouse pointer | No, unless you supply your own cursor image |
| Record one window, or a selected region | No. Whole screen only |
| Pause and resume mid-recording | No |
| Webcam overlay, scenes, start and stop hotkeys | No |
| Trim or edit the result | No. You will need a video editor |
Half of that list matters to you? Skip to the alternatives at the bottom. There is no point setting VLC up for a job it cannot do.
Before you start
- Any VLC 3.0.x build on Windows. If yours is a few years old, grab the current build first.
- Room on your internal drive. Expect a few hundred MB per minute at 1080p, and do not record to a USB stick or a network folder.
- A folder and a filename decided in advance. VLC asks you to type the full name including the extension, and it will not prompt you twice.
Record your screen in VLC, step by step
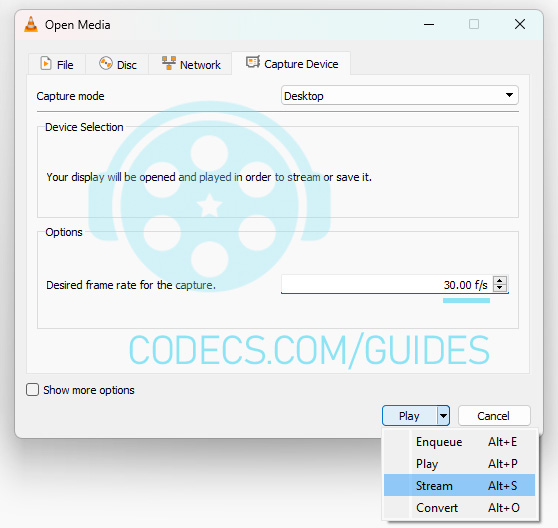
- Open VLC, then choose Media and Open Capture Device. The shortcut is Ctrl and C together.
- On the Capture Device tab, set Capture mode to Desktop.
- Set Desired frame rate for the capture to 30 f/s. Do not skip this one, for the reason in the next section.
- Click the small arrow beside the Play button at the bottom and choose Stream. The shortcut is Alt and S.
- The stream wizard opens on a summary screen. Click Next.
- Under New destination choose File, then click Add.
- Click Browse, pick your folder and type a full filename such as
recording.mp4. Click Next. - Make sure Activate Transcoding is ticked, choose the profile Video - H.264 + MP3 (MP4), and click Next.
- Click Stream. Recording begins immediately, and the timer in the VLC window starts counting up.
- When you are finished, bring VLC back to the front and press Stop. Only then is the file finished and playable.
VLC minimises itself once recording starts, so you can get on with whatever you are capturing.
The frame rate box is the one that catches people
That field opens at 1.00 f/s.
One frame per second is a slideshow. Menus jump three items at a time, text scrolls in jerks, and the recording is unwatchable - and because VLC never complains, most people only find out afterwards.
Set it to 30 for tutorials and general desktop work. Fifteen is fine for something slow like a document walkthrough, and it halves the file size.
Anything above 30 is optimistic. VLC is transcoding on the fly with no hardware encoder behind it, so on a modest machine a high frame rate just means dropped frames instead of smooth ones.
Recording the sound as well
This is the part most guides quietly skip.
VLC's Desktop capture mode has no audio input. It is grabbing pixels, nothing else, so choosing an audio profile in the wizard does not help - it produces a silent file, which is why so many people conclude VLC is broken.
To get sound you attach a second input to the capture. On Windows that means pointing VLC at a recording device, and the device has to exist first.
- Right-click the speaker icon in the taskbar, open Sound settings, then More sound settings, then the Recording tab.
- Right-click in the empty space and tick Show Disabled Devices. If Stereo Mix appears, enable it and note its exact name.
- If Stereo Mix is not there, your audio driver does not expose it. You will need a virtual audio cable, such as the free VB-Audio Virtual Cable, set as your playback device.
- Back in VLC's Open Capture Device window, tick Show more options at the bottom. An Edit Options line appears, reading something like
:screen-fps=30.000000 :live-caching=300. - Append this to the end of that line, replacing the device name with the exact one from step 2:
:input-slave=dshow:// :dshow-vdev=none :dshow-adev=Stereo Mix (Realtek(R) Audio) - Carry on with the Stream wizard as normal. The profile you pick now needs to include audio, so Video - H.264 + MP3 (MP4) is the right one.
Test it for twenty seconds first. If the device name is off by a single character, VLC records the picture perfectly and silently drops the audio, with no error message at any point.
Getting the mouse pointer to show up
VLC does not draw the cursor into the recording. Watch one back and your menus open by themselves, which is close to useless for a tutorial.
The fix is to hand VLC a cursor image. Save a small PNG of a pointer into your VLC program folder, usually C:\Program Files\VideoLAN\VLC\, then add :screen-mouse-image=mouse.png to the same Edit Options line as above.
It will not match your real Windows cursor, and it will not change shape when you hover over a text field. It is still far better than nothing.
Choose a container that survives a crash
An MP4 file only becomes playable when VLC writes its index at the end. Press Stop and you get a working video; crash, lose power, or close the window instead, and you get a file that nothing will open.
This is behind almost every "VLC recorded nothing" report, and there is a simple way around it.
Use the TS profile for anything long. Pick Video - H.264 + MP3 (TS) at step 8 and name the file recording.ts - a TS file is written continuously, so even an interrupted recording still plays back up to the moment it stopped.
Convert it to MP4 afterwards in HandBrake, or in VLC itself - our guide to converting files with VLC covers that in a couple of clicks.
There is an H.265 profile in the same list if you want smaller files. It costs noticeably more CPU while recording, and not every editor will read it - our guide on playing HEVC files in VLC covers the playback side.
Starting the next recording without the whole wizard
Once the first one is done, there is a shorter route that skips most of the clicking.
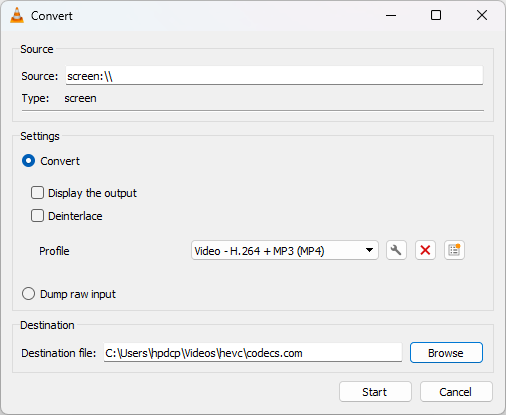
- Choose Media and Convert/Save, or press Ctrl and R.
- The dialog opens on the File tab. Switch to Capture Device and set Capture mode to Desktop and the frame rate to 30 again.
- Click the Convert/Save button, then Browse beside Destination file to pick a new name.
- Click Start. Recording begins, and Stop ends it exactly as before.
When the file is empty, or will not play
- The file is 0 KB, or nothing opens it. You closed VLC rather than pressing Stop, so the index was never written - record to TS next time.
- VLC vanishes the moment you click Stream. Usually a multi-monitor problem, so disable the second display, record, then switch it back on.
- The recording drops frames or stalls. You are writing to a USB stick or a network folder - record to the internal drive and move the file later.
- It plays, but there is no sound. Expected behaviour rather than a fault, so go back to the audio section above.
- Everything looks jerky. The frame rate box was left at 1.00 f/s, or your PC cannot transcode at your screen resolution in real time.
- You get an MRL error instead of a recording. Something in the input string is malformed, usually a typo in the options line - our guide on the MRL error walks through it.
Recording what VLC is playing is a different button
Plenty of people searching for "VLC record" do not want their desktop at all. They want to save a clip out of something VLC is already playing.
That is a separate feature, and it is much easier. Choose View and Advanced Controls, and a red Record button appears on the toolbar - press it during playback and VLC saves the clip to your Videos folder.
It works on local files and on network streams, which pairs neatly with streaming video with VLC.
Check what you are recording. Paid streaming services are protected and will not capture this way, and re-recording copyrighted material generally breaches the terms you agreed to when you signed up.
Who should look elsewhere
Here is the tell. If you have caught yourself wanting to pause the recording, or to capture one window instead of the whole screen, VLC has already run out of road.
These do the job properly, and all of them are on the site:
- ShareX - free and open source, with region capture, hotkeys and audio that works without any of the above.
- Cap Screen Recorder - free and open source, with a webcam overlay and a built-in trim.
- Screenpresso - free edition, and the best annotation editor of the group for step-by-step documentation.
- ScreenToGif - the right answer when what you actually need is a short animated GIF.
- FastStone Capture - a paid trial, worth it for scrolling capture of long web pages.
- Simple Screen Recorder - the shorter road on Linux, where VLC's capture is unreliable and Wayland often blocks it outright.
There are more in the full Screen Capture list if none of those fit.
Quick questions
Can VLC record the screen with sound?
Not on its own. Desktop capture mode has no audio input, so you have to attach a recording device with the input-slave option described above, and that needs Stereo Mix or a virtual audio cable enabled in Windows first.
Why is my VLC recording 0 KB, or why will nothing open it?
An MP4 is only finished when you press Stop in VLC. If VLC crashed or you closed the window, the file has no index and no player can read it. Recording to a TS file instead avoids the problem entirely.
How do I record just one window instead of the whole screen?
You cannot, in the VLC interface. It captures the full desktop and nothing smaller. ShareX does window and region capture in two clicks.
Is VLC good enough for recording gameplay?
Not really. It transcodes in software while your game is using the same processor, so you lose frames in the game and in the recording at the same time. A recorder with hardware encoding is a much better fit.
Where does VLC save the recording?
Wherever you browsed to in the wizard, under the exact filename you typed. The Advanced Controls record button is different - that one saves to your Videos folder automatically.
Does this work on Mac and Linux?
VLC for Mac has a screen input and the same Stream route, but macOS will also ask you to grant VLC Screen Recording permission in System Settings before anything is captured. On Linux the capture module varies by desktop and Wayland sessions frequently refuse outright.


Latest comments
AllInteresting development with the Fire TV Stick 4K — losing Kodi sideloading is a big deal for a lot of users. For those ...
News: The New Fire TV Stick 4K Can't Run Kodi - Here's Which Fire Stick Still Can 3 commentsThanks genius, it worked for me. v2.4.149.0 on windows 10
Guide: How to Download HEVC Video Extension for Free 181 commentsXMediaRecode gives only the option to Copy (No convert) in Audio Mode drop down. I am trying to convert/recode the EAc3 ...
Team replied Guide: How to Convert EAC3 Audio to AC3 or AAC With XMedia Recode 1 comment