FFmpeg is the open-source multimedia engine that quietly powers most of the conversion, streaming, and editing tools you already run. Installing it on Windows takes about five minutes - using it well is what this guide is really about.
FFmpeg is not just a converter. It bundles three command-line utilities:
ffmpeg (the encoder/decoder/transcoder), ffplay (a tiny media player), and ffprobe (an inspector that shows you exactly what is inside a media file).
Once it lives in your Windows PATH, you can call it from any Command Prompt or PowerShell window - in any folder - without typing a full file path. That is the whole point of this guide.
Step 1 - Download FFmpeg for Windows
Grab the latest static build from the official codecs.com page. You do not need an installer - FFmpeg ships as portable .exe files inside a single archive.
- Download FFmpeg - virus-scanned builds from GyanD and BtbN.
- Pick the Essentials build for everyday use, or the Full build if you need every optional codec, filter, and library.
- Choose the .7z archive if you have 7-Zip installed - it is smaller. Otherwise grab the .zip.
Both Essentials and Full include ffmpeg.exe, ffplay.exe, and ffprobe.exe - the three tools the rest of this guide uses.
Step 2 - Extract the FFmpeg Archive
Right-click the downloaded archive and extract it. If you do not have an archiver, install 7-Zip or WinRAR first.
The extracted folder will have a long auto-generated name like ffmpeg-8.1.1-essentials_build. Rename it to something short and predictable.
- Right-click the .7z or .zip archive and choose Extract Here.
- Rename the extracted folder to simply FFmpeg.
- Move the folder to a permanent location - C:\FFmpeg\ is the standard convention.
- Open the folder and confirm you see a bin subfolder containing the three .exe files.
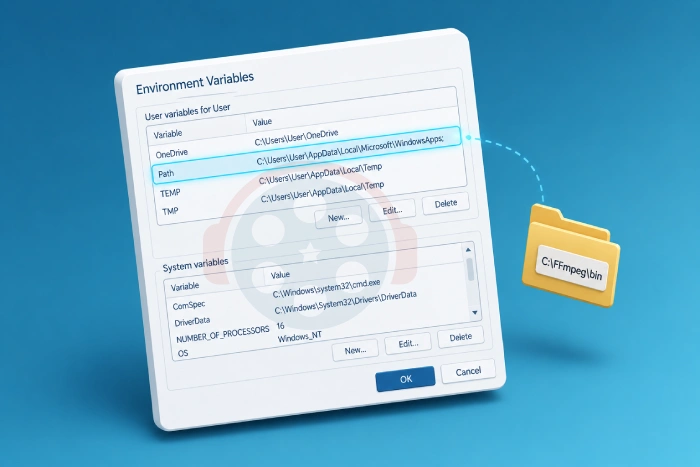
Step 3 - Add FFmpeg to the Windows PATH
Adding FFmpeg to your PATH lets you run the ffmpeg command from any folder, in any terminal window, without specifying its full path every time.
- Press Win + S and type Environment Variables.
- Click Edit the system environment variables.
- In the System Properties window, click the Environment Variables... button at the bottom.
- Under System variables, scroll to find Path, select it, and click Edit.
- Click New and paste:
C:\FFmpeg\bin - Click OK on every dialog to save the change.
Close any open Command Prompt or PowerShell windows after this step. PATH changes only take effect in new terminal sessions.
Step 4 - Verify the Installation
Open a fresh Command Prompt (Win + R, type cmd, press Enter) or PowerShell window and type:
ffmpeg -version
You should see a wall of text starting with the FFmpeg version number, build date, and a list of compiled-in libraries. That confirms the install worked.
10 FFmpeg Commands You'll Actually Use
Most FFmpeg tutorials drown you in flags. Here are the ten commands that handle 90% of real-world tasks - copy, paste, swap the filenames, done.
1. Convert MP4 to AVI (or any other container)
ffmpeg -i input.mp4 output.aviFFmpeg picks sensible defaults from the output extension. Swap .avi for .mkv, .mov, .webm, or .ts to change the container.
2. Extract Audio from a Video
ffmpeg -i video.mp4 -q:a 0 -map a output.mp3The -q:a 0 flag uses the highest variable bitrate. The -map a flag tells FFmpeg to grab only the audio stream and ignore video.
3. Resize a Video
ffmpeg -i input.mp4 -vf scale=1280:-1 output.mp4The -1 tells FFmpeg to calculate the matching dimension automatically and preserve aspect ratio. Use scale=-1:720 to lock height instead.
4. Trim a Clip Without Re-encoding
ffmpeg -i input.mp4 -ss 00:01:30 -to 00:02:45 -c copy output.mp4The -c copy flag does a stream copy - no quality loss and it finishes in seconds rather than minutes.
5. Convert Image Sequence to Video
ffmpeg -framerate 30 -i frame%04d.png -c:v libx264 -pix_fmt yuv420p output.mp4The %04d matches numbered frames like frame0001.png, frame0002.png, and so on.
6. Extract Frames from a Video
ffmpeg -i input.mp4 -vf fps=1 frame%04d.pngfps=1 grabs one frame per second. Change to fps=1/10 for one frame every ten seconds.
7. Stabilize Shaky Footage
ffmpeg -i shaky.mov -vf deshake stable.movFFmpeg's built-in deshake filter is fast but basic. For heavy stabilization, two-pass vidstab is better.
8. Strip Audio and Keep Video Only
ffmpeg -i input.mp4 -an -c:v copy output.mp4-an means "no audio". Combined with -c:v copy the video stream passes through untouched.
9. Merge Audio Onto Video
ffmpeg -i video.mp4 -i audio.mp3 -c:v copy -c:a aac -shortest output.mp4The -shortest flag stops the output when the shorter of the two streams ends.
10. Compress a File for Web Sharing
ffmpeg -i input.mp4 -vcodec libx264 -crf 28 output.mp4 CRF (Constant Rate Factor) 28 is small and acceptable. CRF 23 is the default.
Lower numbers mean better quality and larger files. The sweet spot for web is usually 24-28.
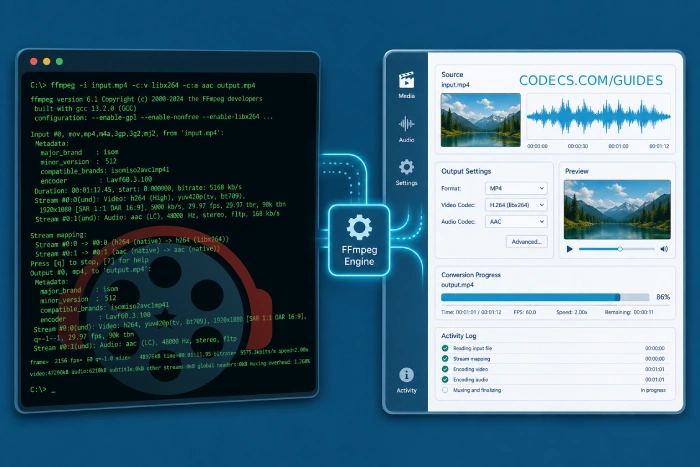
When the Command Line Just Isn't For You
FFmpeg is incredibly powerful but the command line is a barrier for a lot of users. Several free GUIs wrap the same engine in a familiar drag-and-drop interface.
- myFFmpeg - the most polished commercial-grade FFmpeg GUI, with batch processing, presets for every common device, and full HEVC/H.266 support.
- SmartFFmpeg - lighter and free, with one-click presets for mobile formats, audio extraction, and common conversions.
- LosslessCut - if all you need is to trim and join clips without re-encoding, this is the fastest tool on the planet.
The trade-off is the same with every GUI: you get convenience and you give up some of the granular control FFmpeg offers from the command line. If you want the full breakdown of when each makes sense, see our GUI vs CLI comparison guide.
Power Up FFmpeg with Specialized Encoders
FFmpeg is the universal engine, but for specific encoding jobs - HEVC video, modern Opus audio, or batch MP3 conversion - dedicated front-ends save you from memorizing flags.
The X tools below all use your existing FFmpeg install under the hood.
X HEVC Encoder - For H.265 Video Encoding
Encoding to HEVC from the FFmpeg command line means juggling CRF values, preset speeds, profile flags, and HDR metadata.
X HEVC Encoder handles all of that with use-case presets (Archival, Streaming, HDR/4K, Web/Social, Blu-ray, Mobile) and shows you the exact FFmpeg command before encoding starts.
It supports six encoder modes - libx265, x265 CLI, Kvazaar (open-source BSD-licensed), and the GPU encoders NVENC, AMF, and QSV - and auto-detects which are available on your system. Drop your existing FFmpeg .exe in the same folder and you are ready to encode.
X Audio Converter - For Quick Format Switching
For routine audio conversion - WAV to MP3, FLAC to OGG, M4A to Opus - X Audio Converter wraps both LAME and FFmpeg in a clean interface.
There is a browser version that runs entirely client-side (your files never leave your device) and a free Windows desktop app that uses native lame.exe and ffmpeg.exe for 10-20x faster encoding.
Output formats include MP3, OGG Vorbis, Opus, M4A/AAC, FLAC, WAV PCM, WavPack, and TTA. CBR and VBR modes, ID3 tags, and voice-mode presets are all exposed in the UI.
X Opus Encoder - For Modern, Efficient Audio
Opus is the codec that powers WhatsApp, Discord, Zoom, and YouTube. It outperforms MP3 and AAC at every bitrate, especially below 96 kbps. X Opus Encoder is a free Windows GUI for batch-encoding to Opus using FFmpeg's libopus.
It exposes the full libopus parameter set - VBR/CVBR/CBR modes, application modes (audio, voip, lowdelay), complexity 0-10, and EBU R128 loudness normalization for consistent playback volume across your library. Album art and metadata pass through automatically.
Common FFmpeg Errors and How to Fix Them
"ffmpeg is not recognized as an internal or external command"
PATH issue. Re-check Step 3, confirm the path points to the bin subfolder, and open a brand-new terminal window after saving.
"Unknown encoder 'libx265'" or similar codec error
You likely downloaded the Essentials build, which has fewer optional codecs. Grab the Full build from the same FFmpeg download page and replace the .exe files in C:\FFmpeg\bin.
"Permission denied" when writing the output file
You are trying to write to a folder that requires admin rights, like C:\Windows\ or Program Files. Run the command from a folder you own (Desktop, Documents, or a custom workspace folder).
Output video plays back jerky or out of sync
Add -async 1 for audio sync issues, or re-encode with -r 30 to force a constant frame rate. Most playback issues come from variable-frame-rate sources fed through stream-copy commands.
Going Further with FFmpeg
Once you are comfortable with the basics, the next step is leveraging FFmpeg with external encoders. Our rav1e + FFmpeg AV1 encoding guide walks through that workflow for high-quality, royalty-free AV1 video.
For a deeper look at why so many editors prefer FFmpeg over commercial alternatives, see our breakdown of FFmpeg vs paid media encoders.


Free Popular IPTV Playlist: Where to Get Fres...
Cool and well web to get anything
Read More →How to Download HEVC Video Extension for Free
Still works July 2026!
Read More →VBR vs CBR MP3: Better Sound at Half the Size...
Best encoding MP3 only ABR. Audio Quality: ABR>VBR>CBR but for some reason they are trying to hide ...
Read More →