FFmpeg does the decoding, rav1e does the encoding, and one pipe joins them. Here are the commands that work.
AV1 gives you roughly half the file size of H.264 at similar quality, with no licensing fees attached.
The catch is that encoding it is slow.
rav1e is the answer to that, and paired with FFmpeg it will turn almost anything into an efficient AV1 file.
What Makes rav1e Different
rav1e is written in Rust and co-developed by Xiph.Org and Mozilla, with hand-written assembly for x86 and ARM. It was built for speed from the start, unlike libaom, which is the reference encoder and optimised for compression above all else.
The trade is a few percentage points of efficiency against libaom. When libaom can take ten times longer on the same clip, that trade is usually worth making.
- Fast. Substantially quicker than libaom on most content.
- Safe. Memory-safe Rust, which in practice means fewer crashes on long encodes.
- Predictable. Consistent behaviour across different kinds of footage.
- Royalty-free. No licensing fees, ever.
Leave the defaults alone where you can. rav1e ships with sensible settings and it is genuinely hard to make it worse by changing nothing. Every option below earns its place; you do not need all of them at once.
The Shortcut: FFmpeg May Already Have rav1e Built In
Before setting up a pipe, check whether your FFmpeg build includes the librav1e wrapper. If it does, you can skip the second program entirely.
ffmpeg -h encoder=librav1eIf that prints a list of options rather than an error, you are set. Encode straight from FFmpeg:
ffmpeg -i input.mp4 -c:v librav1e -qp 80 -c:a libopus -b:a 128k output.mkvThis handles audio and muxing in the same pass, which the pipe method cannot do. Anything librav1e does not expose directly can be passed through with rav1e's own option names.
ffmpeg -i input.mp4 -c:v librav1e -qp 80 -rav1e-params speed=6,photon-noise=8 -c:a libopus -b:a 128k output.mkvFFmpeg's own tile_cols and tile_rows options are log2 values, so 2 means four tiles, not two. rav1e's --tile-columns is a literal count. Set tiles through -rav1e-params using rav1e's names and you avoid the confusion entirely.
If your build has no librav1e, or you want rav1e's newest options, the pipe method below works with any FFmpeg.
Step 1: Get the Two Tools
Grab the latest FFmpeg build for decoding and audio, then download rav1e for the encoding itself.
Extract both somewhere your terminal can reach. On Windows, adding them to your system PATH saves a lot of typing later.
Check both are working:
ffmpeg -versionrav1e --versionEach should print version information. A "command not found" error means the PATH entry did not take, not that the download failed.
How the Pipe Works
FFmpeg reads your source file, converts it to raw Y4M video that rav1e understands, and hands it straight over without writing anything to disk in between.

The simplest command that works:
ffmpeg -i input.mp4 -pix_fmt yuv420p -f yuv4mpegpipe - | rav1e - -o output.ivf --quantizer 80- -i input.mp4 - your source file.
- -pix_fmt yuv420p - standard 8-bit colour.
- -f yuv4mpegpipe - - send raw video to the pipe instead of a file.
- rav1e - - read from the pipe rather than from disk.
- --quantizer 80 - quality. Lower means better and bigger.
Step 2: Pick a Quantizer
Quantizer is your main quality dial. rav1e uses 0 to 255, lower being higher quality, and the default is 100.
Coming from x264 or SVT-AV1, multiply your usual CRF by roughly four. A CRF of 20 lands around quantizer 80.
- 60 to 70 - archival. Big files, very close to the source.
- 75 to 85 - high quality. The right range for most things.
- 90 to 110 - web streaming. Noticeably smaller, still good.
- 120 to 150 - low bandwidth. Maximum compression.
Treat the conversion as a starting point. The multiply-by-four rule gets you close, but the two scales do not map exactly and different footage responds differently. Encode thirty seconds, look at it, adjust.
Step 3: Encode in 10-Bit
Ten-bit encoding reduces banding in gradients and dark scenes, and it does so even when your source is 8-bit. Almost every current device plays 10-bit AV1 without complaint.
ffmpeg -i input.mp4 -pix_fmt yuv420p10le -strict -2 -f yuv4mpegpipe - | rav1e - -o output.ivf --quantizer 80The -strict -2 flag is what allows FFmpeg to write 10-bit Y4M. Leave it out and the command fails.
Step 4: Use Tiles for 4K
Tiling splits each frame into sections that encode in parallel, which makes a large difference on a multi-core machine. It also helps playback on weaker hardware.
ffmpeg -i input_4k.mp4 -pix_fmt yuv420p10le -strict -2 -f yuv4mpegpipe - | rav1e - -o output.ivf --quantizer 68 --tile-columns 2 --tile-rows 1Two columns by one row is the recommended shape for 4K. Below 4K, tiles cost more in efficiency than they return in speed, so leave them off.
Step 5: Film Grain Synthesis
Grain is expensive to encode because it is essentially noise. The --photon-noise option denoises the source, then writes grain parameters into the stream so the decoder regenerates it on playback.
ffmpeg -i input.mp4 -pix_fmt yuv420p10le -strict -2 -f yuv4mpegpipe - | rav1e - -o output.ivf --quantizer 80 --photon-noise 8Values from 4 to 12 suit most footage, with higher numbers applying more synthetic grain. On genuinely grainy film this can cut the file size substantially with no visible loss.
Step 6: Mux It Into a Real File
rav1e writes raw IVF, which has no audio and which most players will not touch. You need to put the video and audio into a container.
Pull the audio out of the source first:
ffmpeg -i input.mp4 -vn -c:a libopus -b:a 128k audio.opusThen combine the two:
ffmpeg -i output.ivf -i audio.opus -c copy final_video.mkvMKV is the safer choice for local playback and works well in VLC Media Player.
For the web, a WebM container with AV1 video and Opus audio is the standard pairing, and the WebM DirectShow filters cover playback on older Windows setups.
MKVToolNix does the same job with a graphical interface if you would rather not type it, and it is better than FFmpeg for adding subtitles and chapter marks afterwards.
Step 7: Check What You Actually Made
Open the finished file in MediaInfo and confirm three things before you delete the source.
- The video format reads AV1, not something FFmpeg fell back to.
- The bit depth says 10 bits if that is what you asked for.
- The audio track is present and is the length you expect.
A mismatched duration between video and audio is the usual sign that a pipe was interrupted partway through.
A Complete 1080p Example
Everything above, combined into one realistic encode:
ffmpeg -i "My Video.mp4" -pix_fmt yuv420p10le -strict -2 -f yuv4mpegpipe - | rav1e - -o encoded.ivf --quantizer 75 --speed 6 --photon-noise 6Then bring the original audio across:
ffmpeg -i encoded.ivf -i "My Video.mp4" -c:v copy -c:a libopus -b:a 128k -map 0:v -map 1:a final.mkv--speed 6 is a sensible middle. Speeds 0 to 4 produce smaller files and take dramatically longer; 7 to 10 are fast and less efficient.
If You Would Rather Not Use the Command Line
The rav1e GUI wraps all of this. It splits the video into segments, encodes them in parallel, and merges the result.
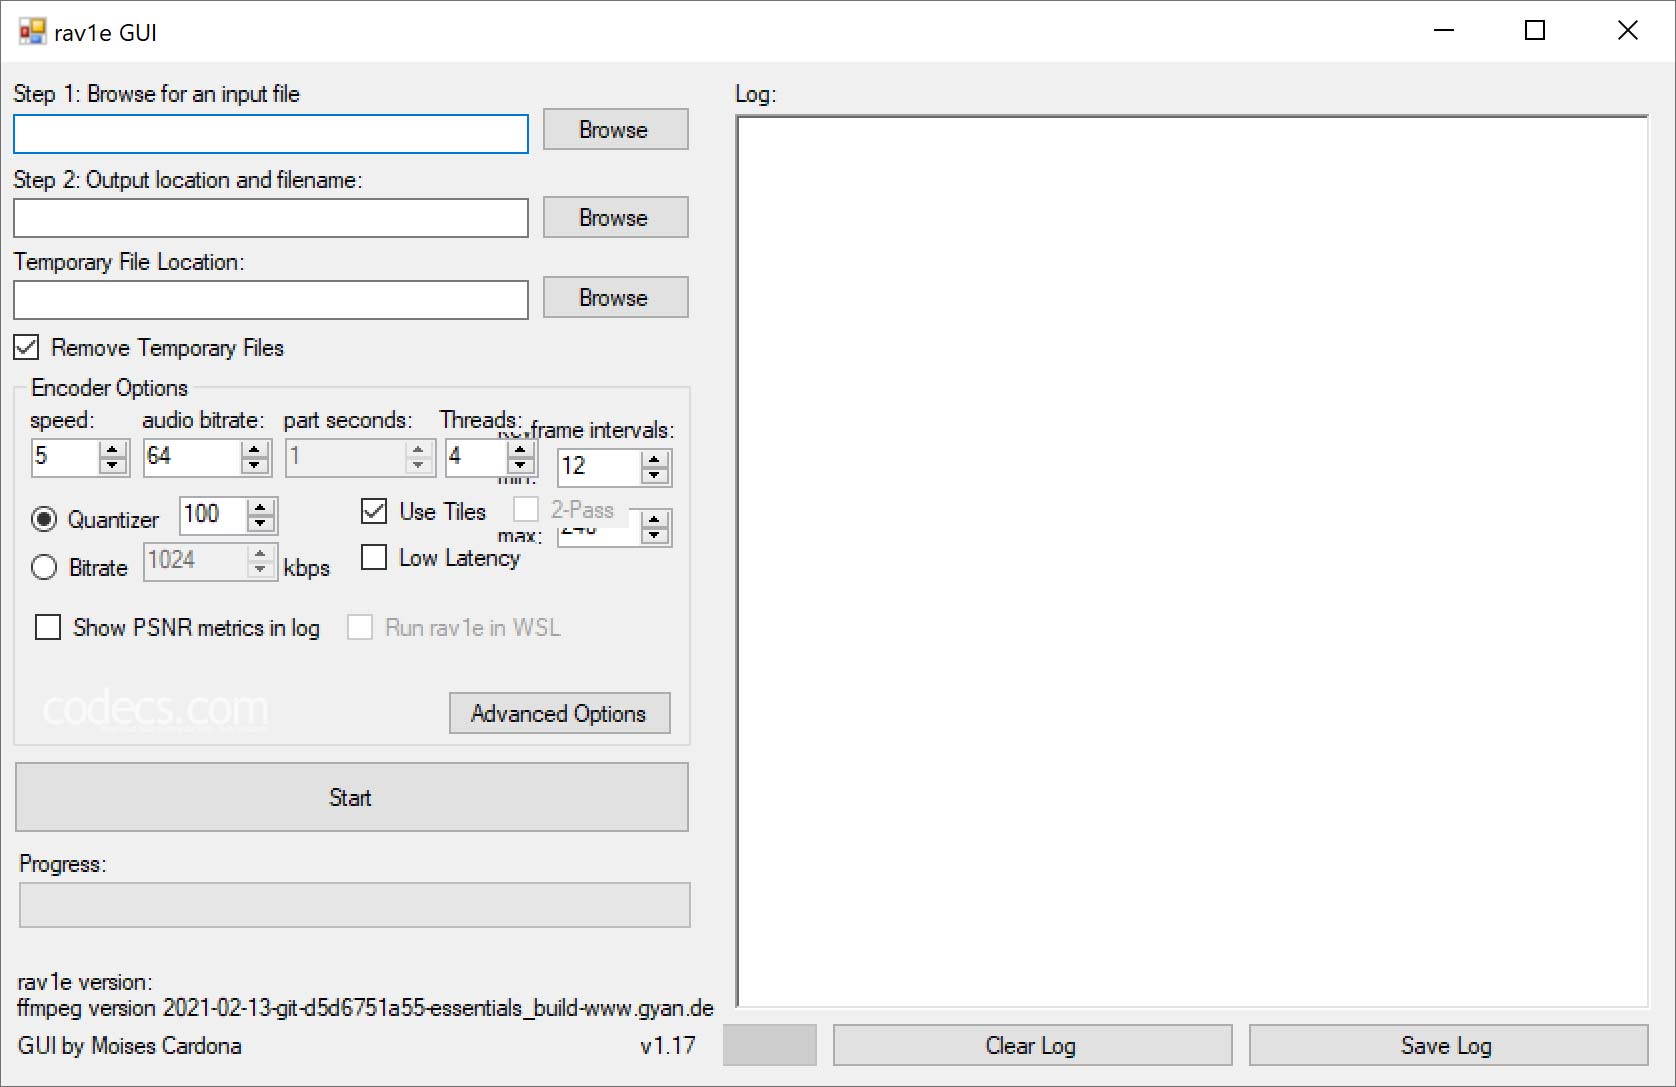
Put ffmpeg.exe and rav1e.exe in the GUI's own folder before launching it, or it will not find them.
HandBrake is the other option worth knowing, though it encodes AV1 through SVT-AV1 rather than rav1e. For batch work with a queue, it is the friendlier tool.
When It Goes Wrong
The pipe fails on Windows. Command Prompt handles binary pipes badly. Use PowerShell, or sidestep it with the librav1e method above.
Encoding is unbearably slow. Raise the speed preset before anything else, and add tiles only if the source is 4K.
The output will not play. AV1 support is good now but not universal, and VLC decodes it natively when nothing else will.
For system-wide playback, install the K-Lite Codec Pack or the AV1 Video Extension.
Our guide on how to play AV1 videos on Windows 11 covers the rest of the setup.
Browsers are a separate question, and if you are wondering why some sites serve you AV1 and others do not, our guide on how to enable AV1 on YouTube explains what is actually happening.
rav1e Against the Alternatives
Versus libaom. libaom compresses slightly better; rav1e finishes far sooner. Pick rav1e whenever your time is worth more than the last few percent of file size.
Versus SVT-AV1. SVT-AV1 scales better across many cores and is what most GUI tools use. rav1e is simpler to drive and safer on long jobs. Both produce good results.
There are more options in the video encoders category, and if the terminology here is unfamiliar, our explainer on containers and codecs is the place to start.
Quick questions
Do I need both FFmpeg and rav1e?
Not always. Run ffmpeg -h encoder=librav1e first - if your build includes the wrapper, FFmpeg alone will do the whole job including audio and muxing.
What quantizer should I start with?
Try 80. It sits in the high-quality band and gives you room to move in either direction after you have looked at a short test encode.
Why does rav1e output a file my player will not open?
IVF is a raw video stream with no audio and almost no player support. Mux it into MKV or WebM as shown above and the problem goes away.
Is 10-bit worth it if my source is 8-bit?
Usually yes. Encoding at 10-bit reduces banding in gradients even from an 8-bit source, and it costs very little extra time.
Should I use tiles on a 1080p video?
No. Tiling helps encoding and decoding speed at 4K, but below that it costs more compression efficiency than the speed is worth.
Is rav1e or SVT-AV1 faster?
SVT-AV1 generally wins on machines with a lot of cores because it threads more aggressively. On an ordinary desktop the difference is much smaller than the gap between either of them and libaom.
Start with a thirty-second clip and a quantizer of 80, look at the result, then scale the same command up to the full file.
Download rav1e and try it on something short, or tell us what settings worked for your footage.


Latest comments
AllXMediaRecode gives only the option to Copy (No convert) in Audio Mode drop down. I am trying to convert/recode the EAc3 ...
Guide: How to Convert EAC3 Audio to AC3 or AAC With XMedia Recode 1 commentTo view major football league live
Guide: Free Popular IPTV Playlist: Where to Get Fresh, Legal M3U Links in 2026 19 commentsThe link isn't working. [link]
Guide: Free M3U Playlist for TiviMate: Legal Lists That Load Cleanly 1 comment