Bloated MP4s and AVIs filling your drive? StaxRip turns any source video into a half-size H.265 file for free - here is the 10-step 2026 workflow.
StaxRip is a free Windows front-end that wraps the x265 encoder and turns the complicated business of HEVC encoding into a clickable workflow.
If you have ever stared at a 12 GB Blu-ray rip or a 4K phone recording and wondered how to shrink it without ruining the image, this is the tool that does it.
The same source file, re-encoded as H.265, routinely lands at half the size with no visible quality loss on a normal screen.
The walkthrough below covers the full 2026 workflow - install, source, encoder choice, container, audio, and the part that breaks most encodes: monitoring the job and catching errors before you waste hours.
StaxRip needs a 64-bit Windows 10 or 11 install, .NET 8 Desktop Runtime, and Visual C++ 2015-2022 Redistributable. The installer flags missing dependencies on first launch and links straight to them.
Budget around 2.5 GB of disk space for StaxRip plus its bundled tools, and roughly twice the source file size as scratch space for the encode itself.
Step 1: Install StaxRip
Grab the latest build from the StaxRip download page on codecs.com. The current release is v2.36 and ships as a self-contained 7z archive.
Run the StaxRip.exe and accept the defaults unless you have a specific reason to change them.
On a clean system the whole process takes under a minute.
Step 2: Set Up the Settings Directory
Create a shortcut and launch StaxRip from the desktop. On the first run it asks where to store its settings directory.
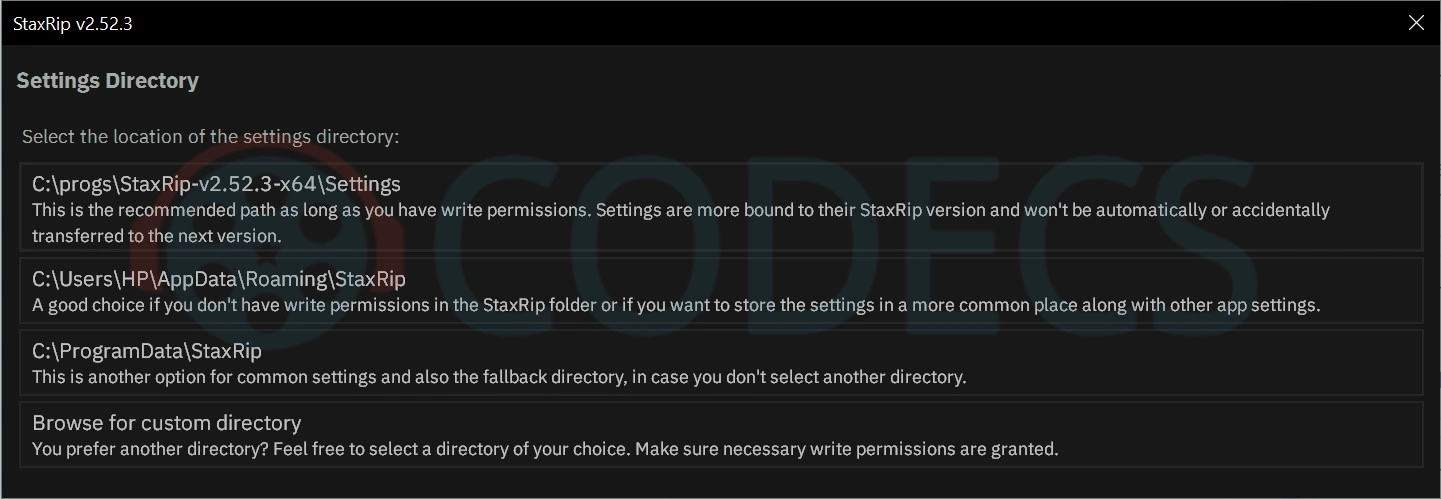
Pick somewhere persistent - the default location inside your user folder is fine for most setups.
If you plan to run StaxRip from a USB stick, point it at a folder on that drive instead so your presets travel with it.
Step 3: Add the Source Video
Right-click on the Source panel in the top-left corner of the StaxRip interface.
From the menu choose Open, then Single File from the "Select a method for opening a source" prompt.
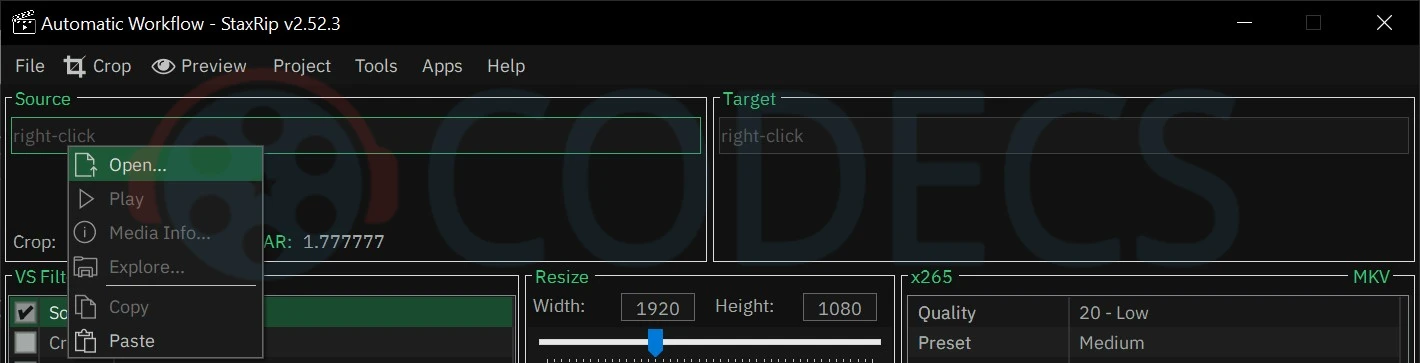
Browse to the file you want to encode and click Open.
StaxRip will analyse the source - resolution, frame rate, audio tracks, subtitle tracks - and pre-populate the timeline.
For a typical 1080p Blu-ray rip this scan takes a few seconds. For a 4K HDR source it can take half a minute while StaxRip pulls the colour metadata.
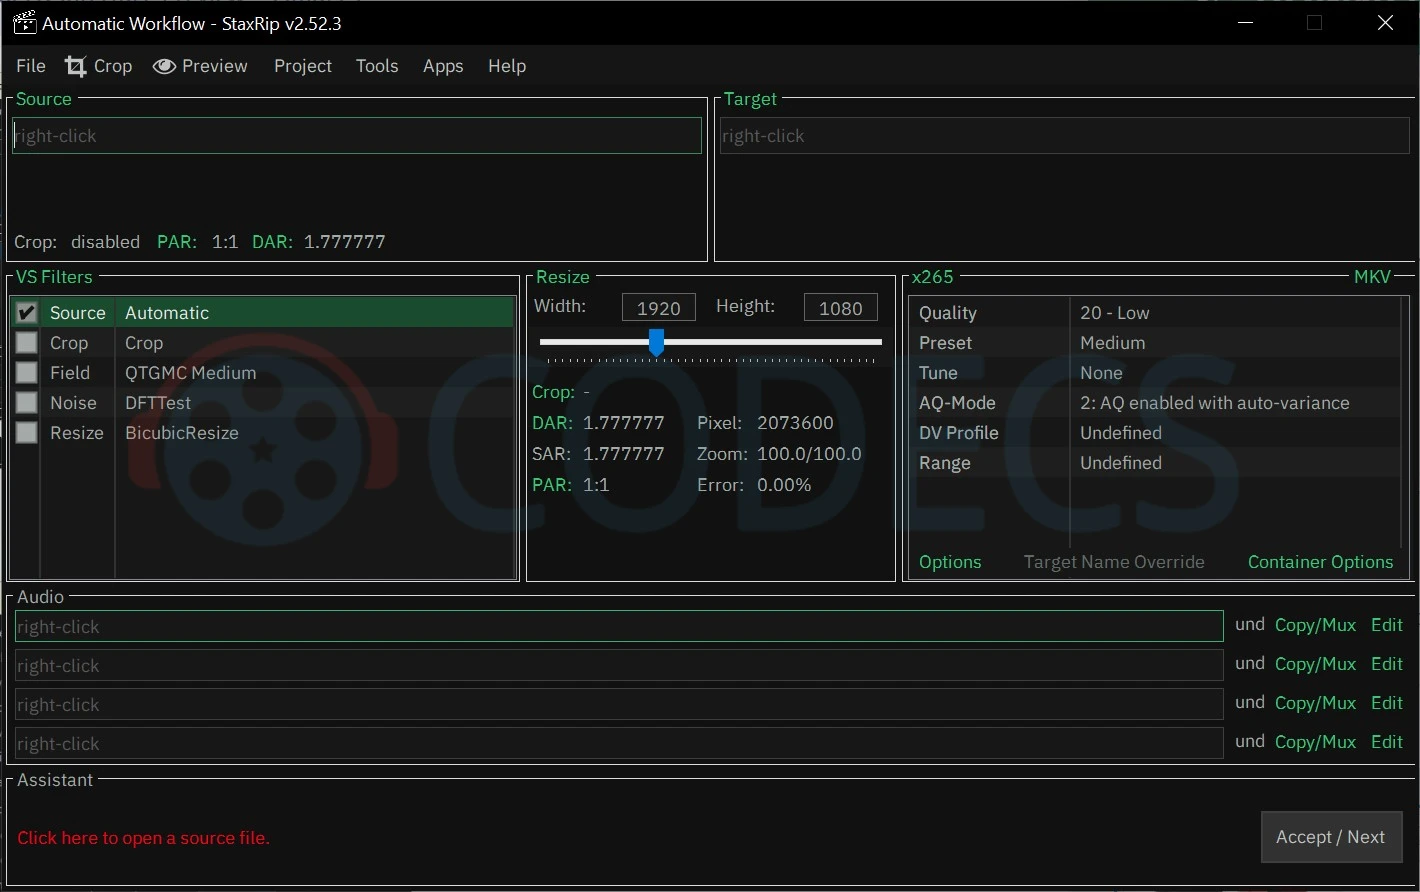
Step 4: Choose the x265 Encoder
StaxRip can drive several different encoders.
For HEVC the right pick in almost every case is the open-source x265 encoder - it produces the smallest files at a given quality target and is the de facto standard for archival H.265 work.
Click the Encoder tab and choose x265 from the drop-down menu.
The Formats tab nearby lets you tweak the container, which we will set in the next step.
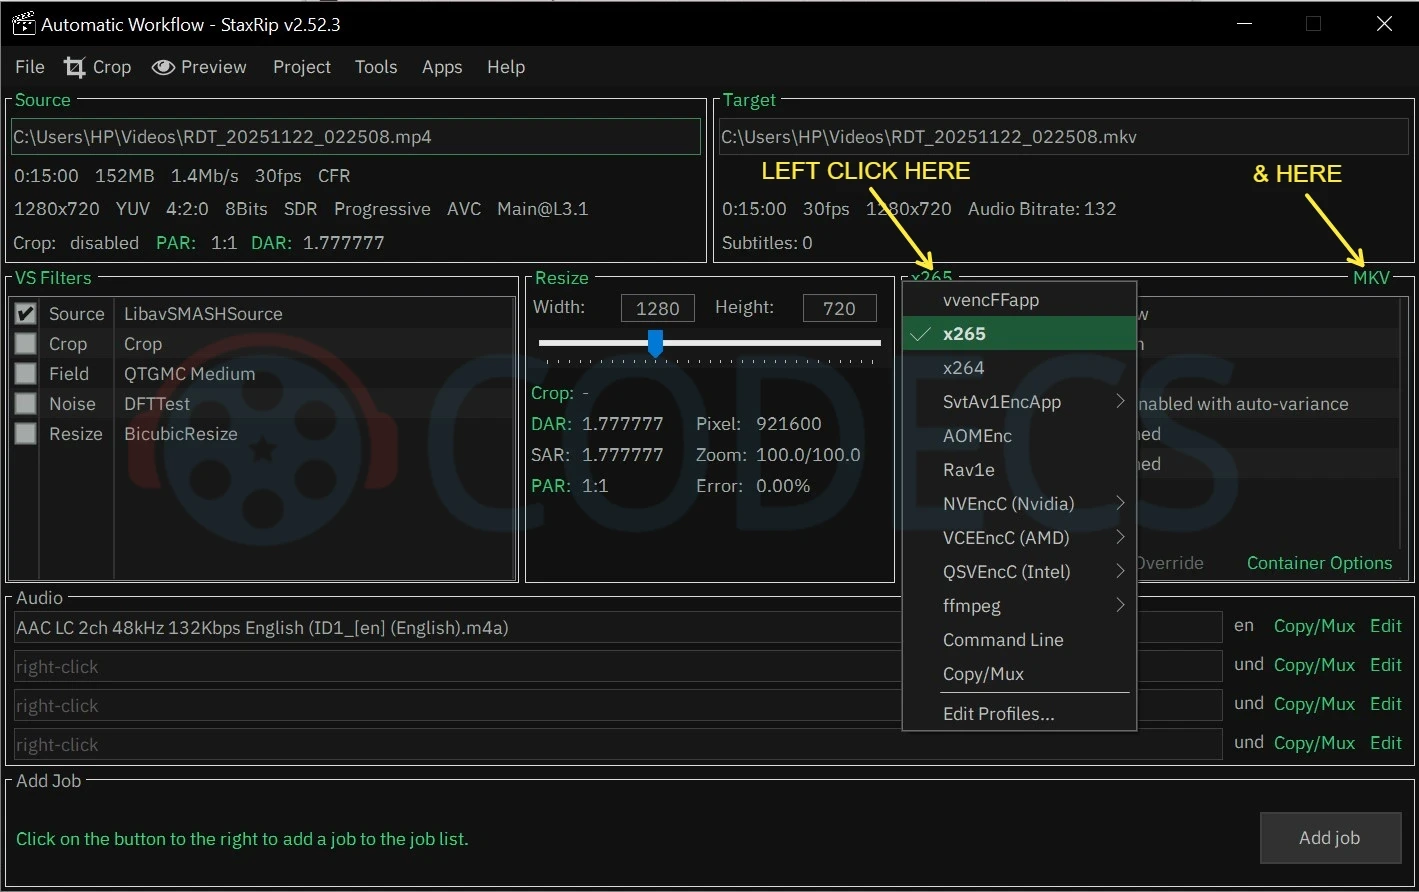
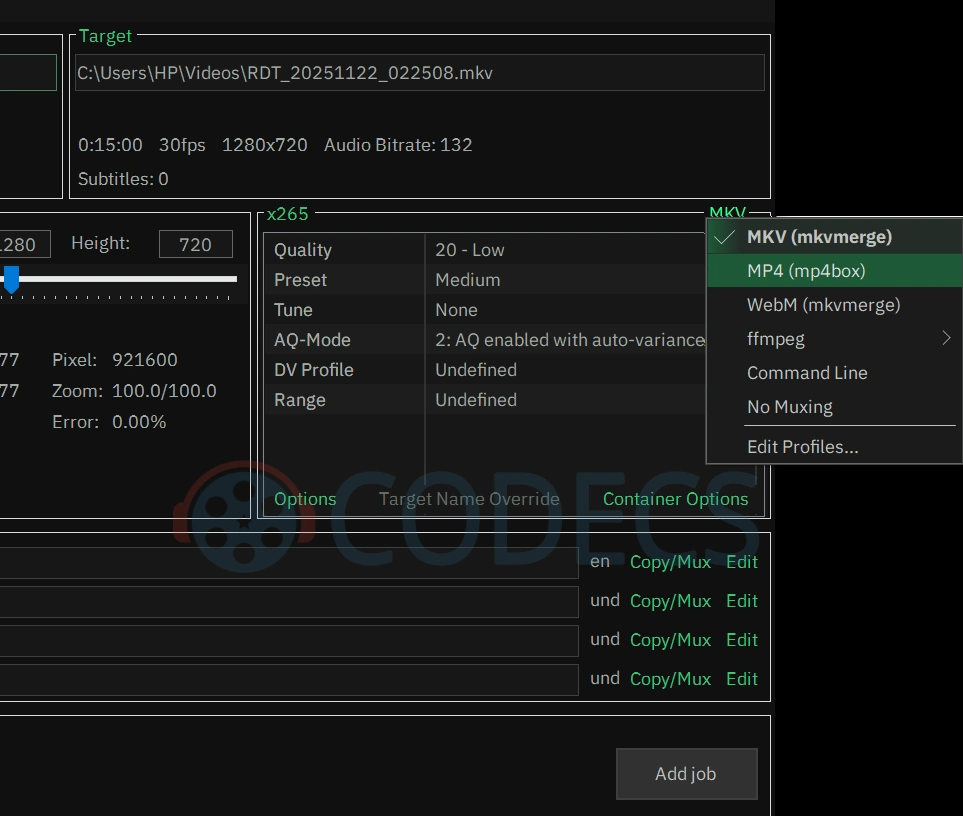
Step 5: Pick the Output Container
Under the Container section, choose the wrapper format for the finished video.
HEVC files are usually delivered in MKV because it handles HDR metadata, multiple audio tracks, and chapters without complaint.
MP4 is the right choice if you need broad device compatibility - phones, browsers, smart TVs. The image quality is identical to MKV; only the metadata layer differs.
Step 6: Configure Video Quality
This is where the file-size magic happens. The x265 panel on the right side of the interface has six controls - in practice you only need to think about three of them.
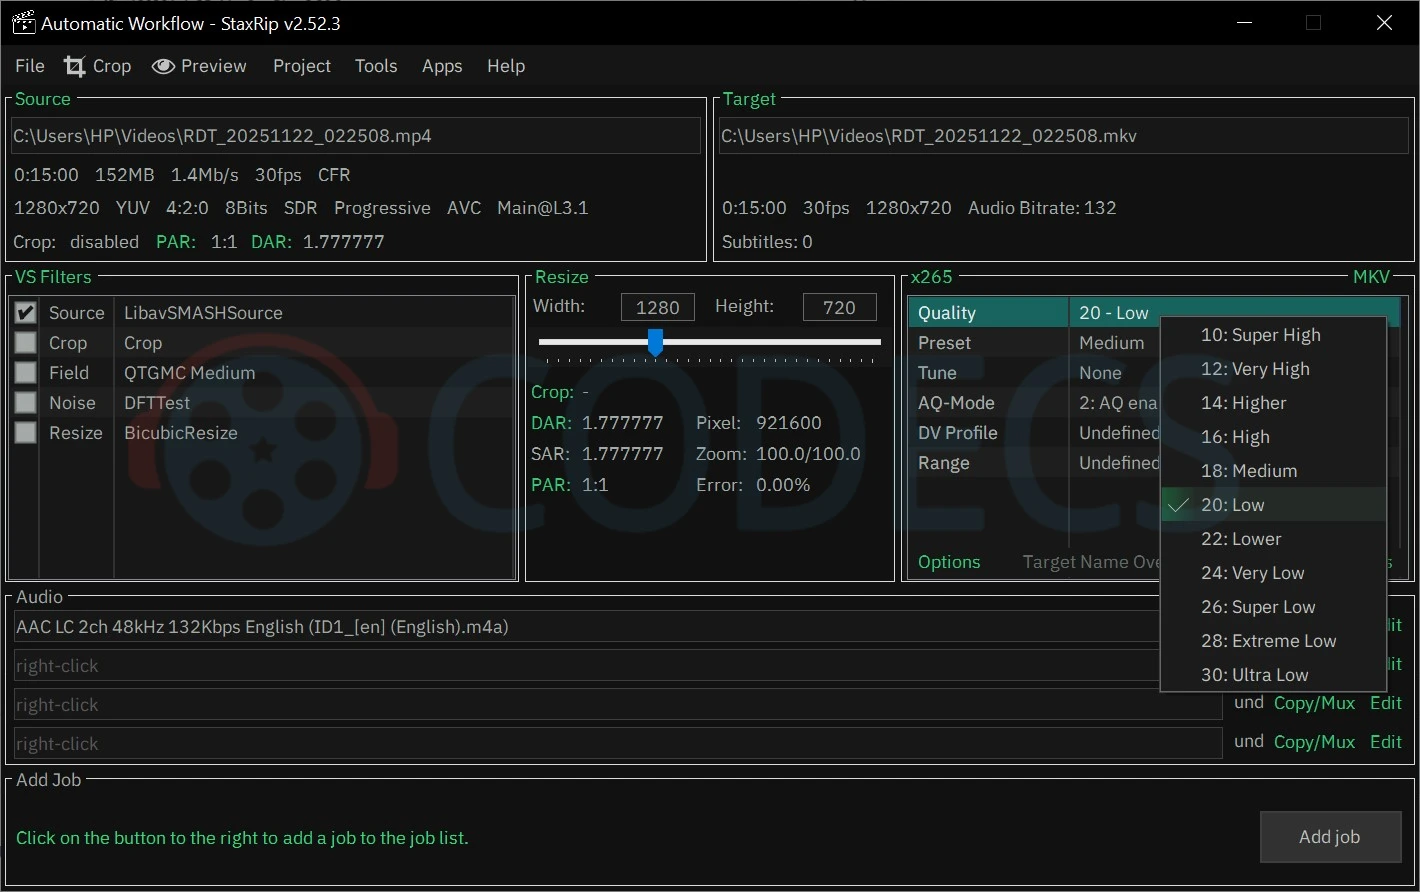
Quality sets the CRF value behind the scenes but shows it as a friendly label. The number in each option is the actual CRF - lower number means bigger file and better quality.
The default "20 - Low" is the sweet spot for general use; "18 - Medium" is the right pick for archival keepers; "22 - Lower" through "24 - Very Low" suit streaming and social shares.
Preset controls how hard the encoder works on the source. Leave it on Medium - that is the right default. Slow shaves another 5-10% off the file size but doubles encoding time, while Veryfast halves the encode at a noticeable size cost.
Tune tells x265 how to handle specific content. Leave it on None for typical movies and recordings. Switch to grain for older films where you want to preserve visible grain, or animation for cartoons and anime where flat colours and hard edges need different handling.
The remaining three controls - AQ-Mode, DV Profile, Range - should stay at their defaults (2: AQ enabled, Undefined, Undefined). AQ-Mode 2 tells the encoder to spend more bits on dark and complex regions where artifacts are most visible. DV Profile is only relevant for Dolby Vision HDR sources, and Range auto-detects from the source colour space.
The full Quality dropdown maps to these typical use cases:
| Quality setting | CRF | Best for |
|---|---|---|
| 10 - Super High | 10 | Near-lossless masters; rarely needed |
| 14 - Higher | 14 | Premium archival, 4K HDR keepers |
| 18 - Medium | 18 | Visually lossless for long-term storage |
| 20 - Low (default) | 20 | General use, recommended starting point |
| 22 - Lower | 22 | Streaming uploads and shares |
| 24 - Very Low | 24 | Quick previews, social media |
| 26 - Super Low | 26 | Mobile messaging, low-bandwidth |
| 28 - Extreme Low | 28 | Bandwidth-constrained delivery only |
| 30 - Ultra Low | 30 | Compression demos; artifacts visible |
Step 7: Set the Audio Track
Under Audio, choose the codec for your output. AAC at 128-192 kbps is the standard choice and plays on every device made in the last decade.
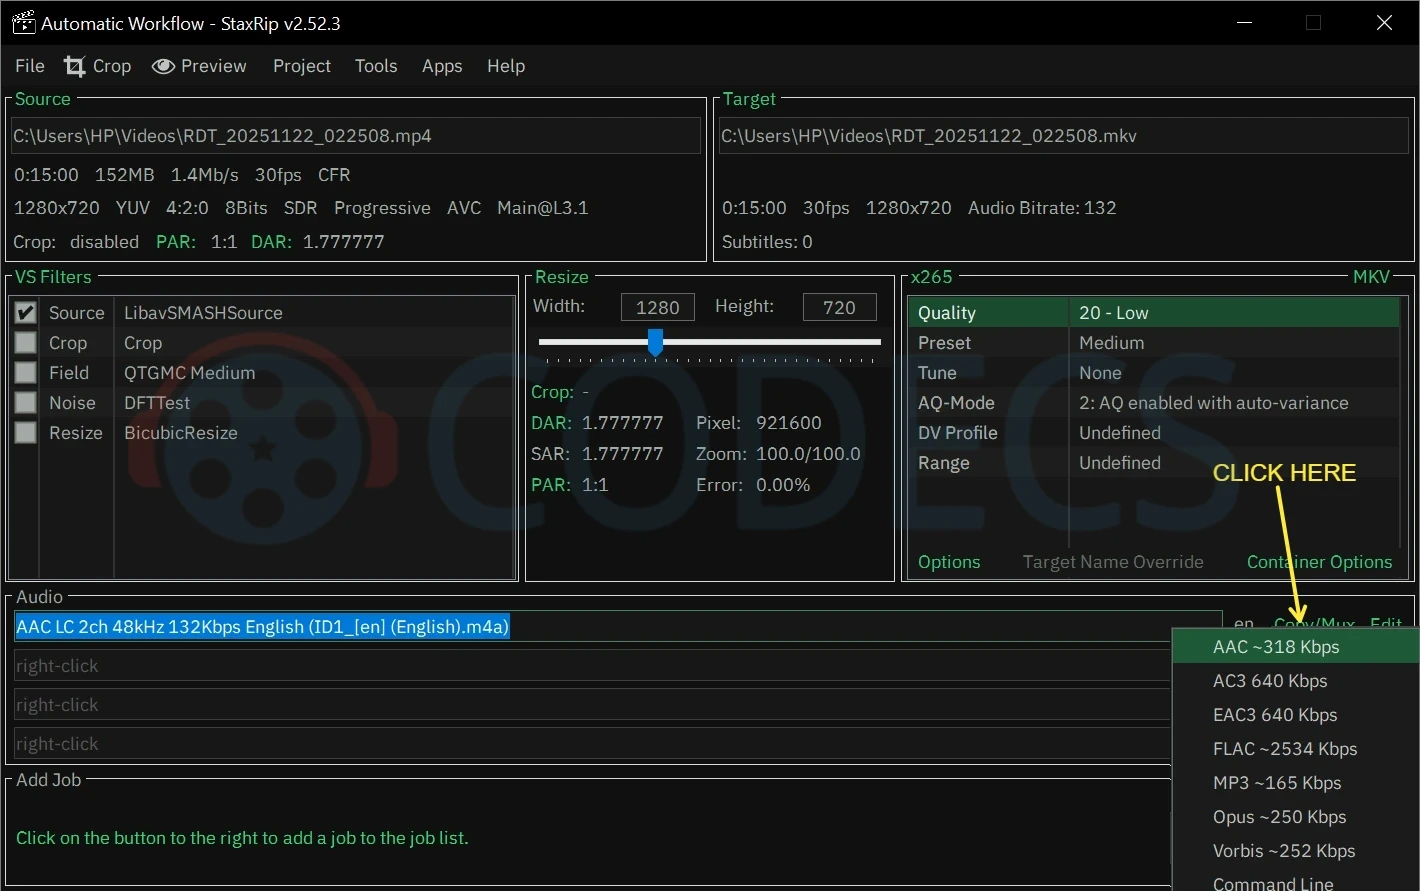
If you are archiving and want bit-perfect audio, choose passthrough instead - StaxRip will copy the original track without re-encoding.
This is the right pick for lossless source audio like FLAC or PCM, where any re-encode would degrade it.
Step 8: Queue the Job
Review every setting one more time. Resolution, encoder, CRF, audio - a misconfigured job that runs for two hours and produces the wrong output is the single biggest waste of time in video encoding.
Click "Add job" at the bottom of the StaxRip interface. The job opens in the queue window and starts immediately unless you tell it to wait.

Step 9: Monitor the Encode
StaxRip shows a progress bar with frames-per-second, percentage complete, and an estimated time remaining. A typical 1080p film on a recent six-core CPU finishes in 30-90 minutes at the medium preset.
Keep an eye on the encoding log in the bottom pane. Genuine errors appear in red and stop the job; warnings in yellow are usually safe to ignore.

Step 10: Test the Output
Once the job completes, open the encoded file in your preferred player and scrub through it. Check the start, a middle scene, and the credits - HDR metadata or audio sync problems usually surface immediately.
If the file refuses to play, the problem is almost always a missing decoder on the playback device, not a bad encode. The next section covers that.
StaxRip Feels Heavy? Try a Lighter Front-End
StaxRip is comprehensive and powerful, but the trade-off is complexity - the GUI exposes hundreds of options that most users will never touch. If the workflow above feels like overkill for a quick conversion, two free alternatives are worth knowing about.
X HEVC Encoder is a single-window front-end that ships as a 10 MB portable .exe.
It exposes the same x265 backend StaxRip uses, plus Kvazaar and the three hardware encoders (NVENC, AMF, QSV), but reduces the entire workflow to: open file, pick a use-case preset (Archival, Streaming, HDR/4K, Mobile, Blu-ray, Web/Social), click Encode.
It also shows the exact FFmpeg command before running, which makes troubleshooting unusually transparent. For one-off conversions and HDR work it is the faster path.
HandBrake is the classic middle ground - more options than X HEVC Encoder, less depth than StaxRip, and cross-platform.
The presets are excellent and the UI has not changed much in a decade, which is a feature when you only encode video occasionally.
StaxRip is still the right tool when you are doing serious work - filtering, denoising, AviSynth scripting, batch jobs with per-file overrides. For everything else, X HEVC Encoder gets you there with fewer clicks.
Playing Your Encoded HEVC Files
A H.265 file is only useful if the target device can decode it. On Windows 10 and 11, the Movies and TV app and Windows Media Player need Microsoft's HEVC codec installed.
The free OEM build is available as HEVC Video Extensions from Device Manufacturer on codecs.com - it is packaged as the manufacturer-distributed version that ships with new PCs.
If you would rather skip the system codec entirely, any of the players covered in the Best HEVC Video Players 2026 guide handle H.265 with their own bundled decoders - VLC, MPC-HC, PotPlayer and MPV all play your StaxRip output out of the box.
Pro Tips for Better Encodes
- Two-pass is overrated. CRF mode produces visually identical results to two-pass average bitrate in almost every test. Stick with CRF unless you have a hard file-size target.
- 10-bit is worth it even for 8-bit sources. The Main10 profile uses more precision in the maths and produces smaller files for the same visual quality. Most modern decoders handle it without issue - look for the Main10 or 10-bit toggle in the encoder's Options panel.
- Use the VS Filters panel for problem sources. The filter list on the left side of the StaxRip interface (Source, Crop, Field, Noise, Resize) is more powerful than most users realise. Enabling QTGMC for interlaced footage or DFTTest for noisy phone recordings often saves more bits than any encoder tuning - clean signal compresses better.
- HDR sources need Main10 and colour metadata. If the source is HDR10, the encode must use the Main10 profile and preserve the colour primaries, transfer function, and master display info.
StaxRip auto-detects HDR metadata from the source and passes it through, but always verify with FFprobe or a player like MPC-HC that the output kept the HDR flag. - Hardware encoders are not always faster. StaxRip drives NVENC, AMF, and QSV from the same Encoder dropdown you used for x265 in Step 4 - they finish 1080p encodes in minutes versus the software encoder's hour. For 4K HDR archival the quality gap versus x265 is visible on a calibrated display. Use hardware for speed-sensitive work, software for keepers.
Frequently Asked Questions
How much smaller will my files actually be?
For typical Blu-ray and 4K sources, expect 40-60% reduction at archival-grade Quality settings (CRF 18 / "18 - Medium") with the slow preset.
Streaming-grade encodes at CRF 22-24 ("22 - Lower" or "24 - Very Low") can hit 70-80% reduction versus the original H.264 source. A 12 GB 1080p film often lands between 4 and 6 GB.
Is StaxRip safe to download?
Yes - StaxRip is open-source, hosted on GitHub, and the build distributed via the codecs.com StaxRip download page is the unmodified official release. No adware, no bundled installers.
Why does my encoded file have no audio?
The two common causes are an unsupported audio codec in the source (DTS-HD MA, TrueHD) that StaxRip cannot transcode without the matching decoder, or a passthrough setting that points to a codec the output container does not allow.
Switching the audio profile to AAC 192 kbps fixes the vast majority of these cases.
Can StaxRip do batch encoding?
Yes. Configure the first source with your encoder settings, click Add job to push it onto the queue, then open the next file via the File menu or by right-clicking the Source panel and repeat.
StaxRip processes the queue sequentially and can shut down the PC when all jobs finish - useful for overnight runs.
What about AV1 instead of HEVC?
AV1 produces files roughly 20% smaller than HEVC at the same quality, but encoding is currently 5-10x slower with software encoders.
HEVC remains the practical choice in 2026 unless you specifically need AV1's royalty-free licensing for a commercial workflow.
That's a Wrap
StaxRip turns one of the most technically demanding tasks in desktop video - HEVC encoding - into a repeatable 10-step workflow.
The first encode is the slow one because you are learning the interface; by the third file you will be queuing jobs and walking away.
Experiment with Quality and preset combinations on a short test clip before committing to a full feature.
A 30-second sample re-encoded at three different Quality settings (say, "18 - Medium", "22 - Lower" and "26 - Super Low") shows you exactly where the quality cliff is for your eyes and your screen - and saves a lot of wasted hours on full-length runs.
Happy encoding.
")


Free Popular IPTV Playlist: Where to Get Fres...
5/5Hey rei, That message is VLC's way of saying it went to the address and found nothing there. MRL ...
Read More →How to Use Helium Audio Converter: Convert An...
5/5@levi Yes, it works offline, it's a desktop software.
Read More →Meet Qwant: The Private, EU-Built Alternative...
4/5I didn't know it was EU, AND france. That doesn't sound like a good idea. Related to coding or ...
Read More →