A bootable Ubuntu stick gets a dead PC back on screen, so you can copy your files off it before deciding what to do next.
What you need
- A working PC with a decent internet connection, because the download is several gigabytes.
- A USB stick of 8GB or more, with nothing on it you want to keep.
- Rufus, which runs from the file you download and needs no installation.
- About fifteen minutes, most of it waiting.
Step 1: download Ubuntu
Go to Ubuntu's desktop download page and take the current LTS release.
LTS means long-term support, and it is the one to pick unless you have a specific reason not to.
The file is an ISO and it runs to several gigabytes, so start it downloading before you do anything else.
If you are not sure Ubuntu is the right distribution, the guide to Linux distros for beginners compares the ones that suit a first attempt.
Step 2: write the stick with Rufus
Open Rufus and plug in the stick, then set the four things that matter.
- Device. Pick your USB stick, and check twice that it is the right one.
- Boot selection. Click SELECT and choose the Ubuntu ISO you just downloaded.
- Partition scheme. Leave it on GPT, which suits anything made in the last decade or so - MBR is for genuinely old machines.
- File system. Leave whatever Rufus filled in - it reads the image and picks correctly.
- Click START. If it asks how to write the image, choose 'Write in ISO Image mode'.
- Confirm the erase warning and wait. Five to ten minutes on a USB 3 stick.
Never copy the ISO onto the stick by hand. Dragging the file across in Explorer produces a drive with an ISO sitting on it, not a drive that boots, and it is the single most common reason this does not work.
If Rufus says 'Unable to assign a drive letter'
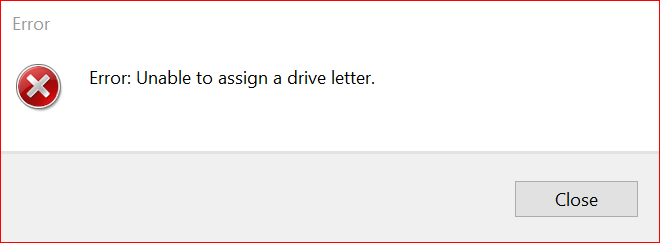
This is a Windows problem rather than anything to do with your stick or the ISO. Windows has not handed Rufus a free drive letter, so the write never starts.
Three things clear it, in order of how often they work: unplug the stick and plug it back in, close any Explorer window or program still sitting on the drive, then disconnect a mapped network drive or a card reader if you have letters tied up.
You do not need to empty or format the stick first. Rufus erases it either way, and files already on it are not the cause.
Step 3: boot the broken PC from it
Plug the stick into the machine you want to rescue and switch it on, tapping the boot menu key as the logo appears. It is Esc or F9 on HP, F12 on most Dell, Lenovo and Toshiba machines, F12 or F2 on Acer, Esc or F8 on ASUS, F11 on MSI, and the Option key on a Mac.
Choose the USB drive from the list, then pick Try Ubuntu rather than Install. That loads a full desktop from the stick and leaves the hard disk completely alone.
If the stick never appears, look in the BIOS for Secure Boot and turn it off, then try again.
Getting your files off
Open the Files application from the dock. Your Windows drive shows up in the sidebar, and clicking it mounts it so you can browse it like any other folder.
Plug in a second USB drive or an external disk and copy across whatever you need. Users, then your account name, then Desktop, Documents, Downloads and Pictures is where almost everything lives.
If Windows was shut down badly or is hibernated, Ubuntu may mount the drive read-only or refuse it. Booting Windows once and shutting it down properly fixes it, and if you cannot do that, turning off Fast Startup from another working Windows machine on the same disk is the next thing to try.
If Rufus is not the right tool
Ventoy is better if you keep several rescue images around. You copy ISO files onto the stick and it boots any of them, so Ubuntu can sit beside a Windows installer without reformatting - the multi-boot Ventoy guide covers the setup.
balenaEtcher is the one to use on a Mac or a Linux machine, where Rufus will not run, and it verifies what it wrote afterwards.
Keeping Ubuntu after the rescue
If the live session convinced you, an older machine can run Ubuntu properly alongside Windows rather than instead of it. The dual-boot guide walks through sharing one drive between the two.
Quick questions
Will this touch the files on my broken PC?
Not if you choose 'Try Ubuntu'. The live session runs entirely from the stick, and the hard disk is only read when you open it yourself.
How big does the USB stick need to be?
8GB is the practical minimum and 16GB gives you room to spare. A USB 3 stick is worth having - the whole session runs at the speed of that drive.
Do I have to empty the stick before I start?
No. Rufus wipes it as part of writing the image, so back up anything you want to keep and then leave it alone.
GPT or MBR?
GPT for anything made in roughly the last decade, MBR only for genuinely old hardware. If GPT does not boot, remake the stick as MBR and try again.
Can I save work I do in the live session?
Not onto the stick itself. Copy anything you create to a second drive or to cloud storage before you shut down, because the session resets.
Does this work for recovering a Mac?
On Intel Macs, usually - hold Option at startup to reach the boot picker. Apple Silicon Macs will not boot a standard Ubuntu stick.


Latest reviews
AllHow to Stream With VLC: Open a Stream URL or Send Your Own
5/5This is amazing! I could no longer afford cable so I cut the cord and started watching Hulu, Youtube, ...
Don't Open a .xmpeg File Before Reading This
3/5It's never a good sign when the potential malware you downloaded has the EXACT same filename as the example. ...
Free Popular IPTV Playlist: Where to Get Fresh, Legal M3U Li...
3/5How can you create a DSTV channels on IPTV?