Installing Windows and Linux on the same SSD allows you to leverage the strengths of both operating systems on one machine.
This guide walks you through the complete dual boot setup process.
Before You Begin
What You'll Need:
- A PC with an SSD (250GB+ recommended).
- Windows installation media (USB or ISO).
- Linux distribution ISO (Ubuntu, Fedora, Mint, etc.).
- Backup of important data.
- 2-3 hours of setup time.
Step 1: Install Windows First
Always install Windows before Linux, as Windows can overwrite bootloaders.
- Create installation media using Microsoft's Media Creation Tool, Rufus, or Ventoy.
- Boot from USB and select your SSD.
- Partition the drive during installation, leaving unallocated space for Linux (at least 50GB).
- Complete Windows installation and updates.
Step 2: Prepare for Linux Installation
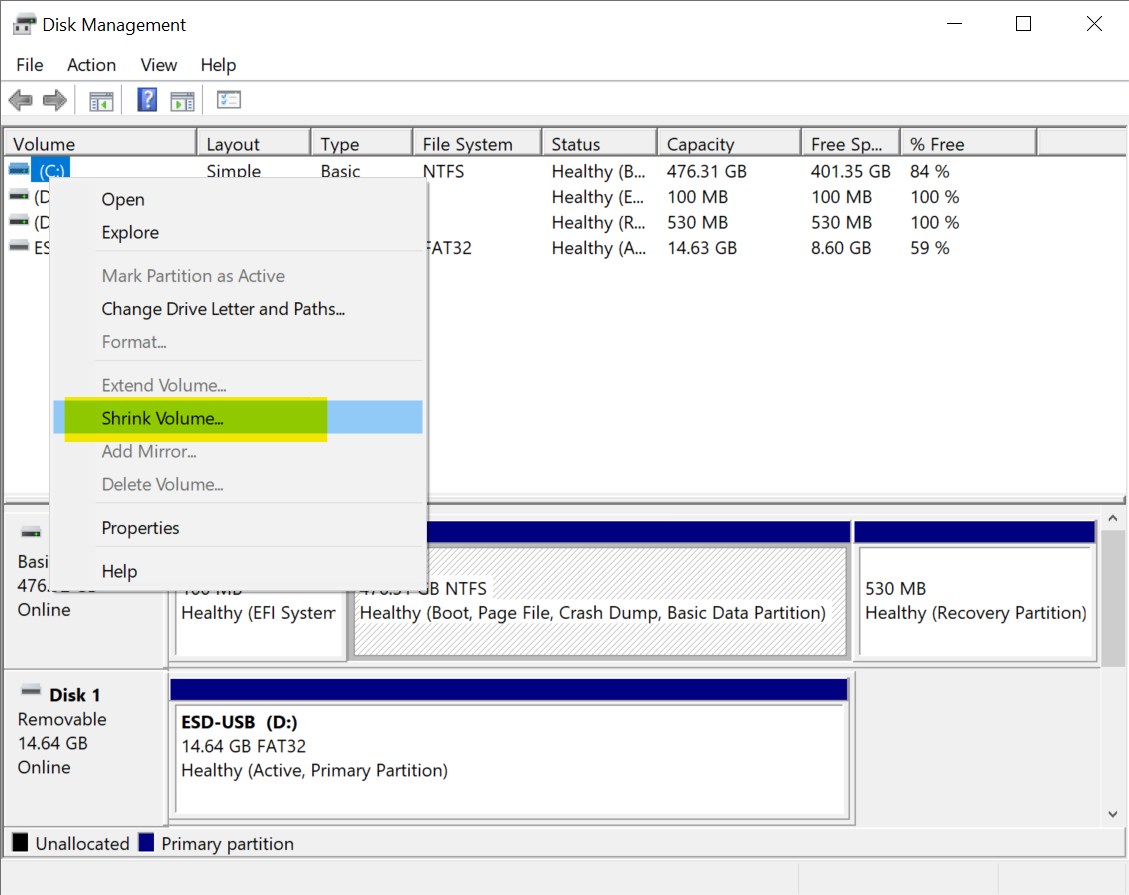
- Shrink Windows partition if you didn't leave space:
- Open Disk Management (Win + X).
- Right-click Windows partition → Shrink Volume.
- Free up 50-100GB minimum.
- Disable Fast Startup in Windows:
- Control Panel → Power Options → Choose what power buttons do.
- Uncheck "Turn on fast startup".
- Disable Secure Boot (if necessary):
- Enter BIOS/UEFI (usually F2, Del, or F12 during boot).
- Find Security settings and disable Secure Boot.
Step 3: Create Linux Installation Media
You have several convenient options for creating bootable installation media:
Option 1: Rufus (Recommended for beginners)
- Download Rufus.
- Insert your USB drive (8GB minimum).
- Select your Linux ISO file.
- Choose GPT partition scheme for UEFI systems.
- Click Start and wait for completion.
Option 2: Ventoy (Best for installing both OSes)
- Download and install Ventoy on your USB drive.
- Copy both Windows and Linux ISO files directly to the USB.
- Boot from the Ventoy USB and select which OS to install.
- No need for multiple USB drives or reformatting.
Option 3: Etcher
- Cross-platform tool that works on Windows, Mac, and Linux.
- Simple interface for creating bootable USB drives.
Step 4: Install Linux
- Boot from Linux USB (change boot order in BIOS if needed).
- Choose "Install alongside Windows" or manual partitioning.
- Manual partitioning setup (recommended):
- Create EFI partition (if not existing): 500MB, FAT32.
- Create Root partition (/): 30-50GB, ext4.
- Create Home partition (/home): Remaining space, ext4.
- Create Swap partition: 4-8GB (equal to RAM for hibernation).
- Install bootloader (GRUB) to the EFI partition.
- Complete installation and reboot.
Step 5: Configure the Bootloader
After installation, GRUB should automatically detect Windows:
- Boot into Linux
- Update GRUB to ensure Windows is detected:
sudo update-grub
- Reboot to see both operating systems in GRUB menu.
Troubleshooting Common Issues
Windows not appearing in GRUB:
- Run:
sudo update-grub - Ensure os-prober is enabled in
/etc/default/grub
Time differences between OSes:
- Linux uses UTC, Windows uses local time.
- Fix: Run in Linux:
timedatectl set-local-rtc 1 --adjust-system-clock
Secure Boot issues:
- Some Linux distros support Secure Boot (Ubuntu, Fedora).
- Otherwise, keep it disabled.
Boot order problems:
- Enter BIOS and set GRUB/Linux as first boot option.
- Windows Boot Manager may take priority.
Best Practices
- Keep Windows updated as major updates can overwrite GRUB.
- Backup GRUB configuration after setup.
- Use separate /home partition for easier Linux reinstalls.
- Defragment before partitioning (for HDDs, not necessary for SSDs).
- Disable hibernation in Windows to prevent file system issues.
Switching Between Operating Systems
Simply restart your computer and select your desired OS from the GRUB menu.
The default timeout is usually 10 seconds before auto-booting the default OS.


Free Popular IPTV Playlist: Where to Get Fres...
5/5Hey rei, That message is VLC's way of saying it went to the address and found nothing there. MRL ...
Read More →How to Use Helium Audio Converter: Convert An...
5/5@levi Yes, it works offline, it's a desktop software.
Read More →Meet Qwant: The Private, EU-Built Alternative...
4/5I didn't know it was EU, AND france. That doesn't sound like a good idea. Related to coding or ...
Read More →